People want what lies on the other side of a form so the process of completing forms should be as simple and easy as possible. No matter what business you are in, forms are an indispensable part of your lead generation journey. Well-designed forms not only collect data efficiently, but also contribute to a positive user experience, which can significantly impact your website’s success.
Studies have shown that confusing or poorly designed forms can lead to cart abandonment rates as high as 80%.
But don’t lose hope!. This blog post outlines the essential elements of designing effective HTML forms. By following these guidelines, you can ensure your forms are user-friendly, secure, and optimized for all devices.
HTML Structure for Forms
Fundamental structure of an HTML form:
An HTML form is used to collect user inputs. Creating well-structured HTML forms is crucial for user experience(UX), accessibility, and maintaining clean code.
The HTML<form>tag is a container for several HTML form elements. TheOrganizing Form Elements:
Use Semantic HTML Elements:
Semantic HTML elements are those that convey the meaning and purpose of the content, rather than just the appearance. For example, using
<form>,<label>,<input>,<select>, and<button>elements for web forms helps screen readers, browsers, and search engines understand the structure and function of the form.Provide Clear and Descriptive Labels:
<label>are text that explain to the users, the purpose of the input fields inside the form. They are crucial for creating user-friendly and accessible forms.How to Write Effective Form Labels:
Give Specific Label Names:
Provide specific label names that clearly describe the expected input. For example, instead of using'Name', specify either'First Name','Last Name', or'Full Name'.<!-- Bad Label: --> <label for="name">Name:</label> <!-- Good Label: --> <label for="name">Full Name:</label>Example of Using Specific Label Names. Always Use Plain Language:
Try to avoid using jargon or technical terms that users might not understand. For example, using'DOB'instead of'Date of Birth'may confuse some users and increase the chances of them abandoning the form.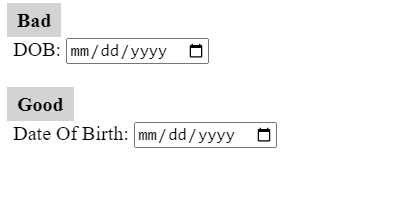
Fig.2.1 - Use plain language for clear communication. Focus on Exact Input Required:
Describe the data expected in the field, like'Phone Number (including area code)'or'Email Address'.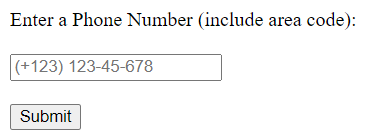
Fig.2.2 - Example of a telephone input field format with area code. Indicate Required Fields:
It is important to clearly mark fields that users must fill out using an asterisk (*) or a note like “Required.”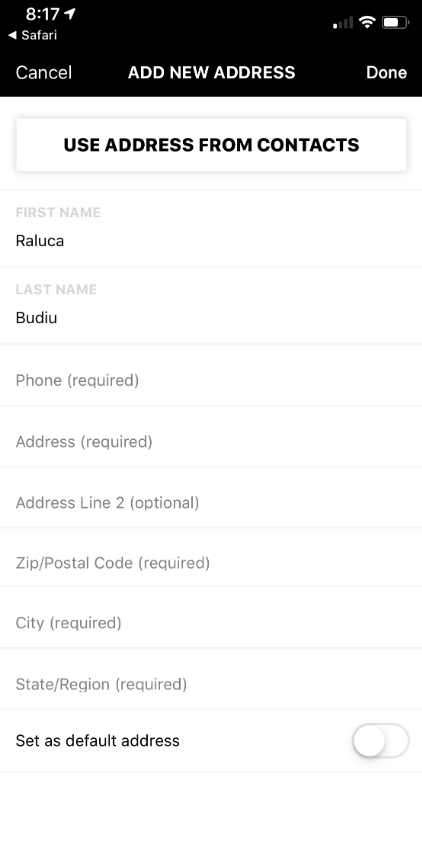
Fig.2.3 - Form field indicating required to be filled out.
Group Related Elements:
Grouping form fields is an essential aspect of form design that enhances user experience (UX) and data organization.
The<fieldset>element is used to group related elements within a form. The<legend>element provides a caption or title for the grouped elements, giving users context about the section.
Organizing Form Elements
Comparison of different types of form groupings, usage scenario, benefits and limitations.
| Type of Grouping | Focus | Use Case Scenario | Examples | Benefits | Considerations |
|---|---|---|---|---|---|
| Thematic Grouping | Groups data fields based on thematic similarities. | Complex forms with a variety of data points. | E-commerce checkout page (billing, shipping, payment) |
|
|
| Functional Grouping | Groups fields based on the actions they perform. | Forms with a specific workflow or sequence. | Online checkout process (shipping, billing, payment) |
| Ensure distinct functionalities to avoid confusion. |
| Input Type Grouping | Groups fields based on the kind of data they require. | Forms with a mix of data types (text, email, phone number). | Contact information section (text fields, email field, phone number field) |
| Suitable for forms with various input types. |
| Control Grouping | Improves user experience by logically guiding choices. | Organizes form elements like radio buttons and checkboxes representing related choices. | Selecting preferred contact method (radio buttons) or interests (checkboxes). |
| Ensure distinct groups to avoid confusion when functionalities overlap. |
| Nested Grouping | Combines different grouping methods to create hierarchical structures. | Complex forms with numerous sections and fields. | Online job application (personal info, work experience, education) |
| Suitable for complex forms. |
| Differentiation Grouping | Groups multiple instances of the same input field with different purposes. | Forms with fields serving similar functions but for distinct reasons. | Emergency contact information (separate fields for home and work phone numbers) |
| N/a |
| Dependency Grouping | Groups form elements where the value of one field affects the visibility or requirements of another. | Forms with fields that depend on user input in other fields. | Shipping address form (state selection affecting city options) |
|
|
4. Consistent Layout
- Use a Logical Flow: Arrange form fields in a logical order, typically from top to bottom and left to right.
- Align Labels and Inputs: Consistent alignment of labels (top-aligned, right-aligned, or left-aligned) improves readability and scannability.
5. Accessible Forms
- ARIA Attributes: Use ARIA (Accessible Rich Internet Applications) attributes to enhance accessibility for screen readers.
- Tab Order: Ensure the tab order is logical and follows the visual order of the form fields.
6. Form Validation
- Real-time Feedback: Provide immediate feedback for users as they fill out the form to reduce errors.
- Error Messages: Display clear and specific error messages near the problematic fields.
7. Input Types and Constraints
- Appropriate Input Types: Use the correct input types (e.g., email, number, date) to take advantage of built-in validation and optimized keyboards on mobile devices.
- Field Constraints: Implement constraints (e.g., maxlength, minlength, pattern) to ensure data consistency and reduce errors.
8. Help Text and Tooltips
- Inline Help: Provide brief instructions or examples directly in the form.
- Tooltips: Use tooltips for additional information without cluttering the interface.
9. Minimize Required Fields
- Essential Information Only: Limit required fields to only the essential information needed to complete the task.
- Optional Fields: Clearly indicate optional fields to reduce user anxiety.
10. Responsive Design
- Mobile-Friendly Forms: Ensure forms are usable on all devices by using responsive design techniques.
- Touch-Friendly Elements: Make sure buttons and interactive elements are large enough to be easily tapped on touch devices.
11. Progress Indicators
- Multi-Step Forms: For longer forms, break them into manageable sections with a clear progress indicator.
- Step Validation: Validate each step individually to prevent users from progressing with errors.
12. Submit Button Placement
- Prominent Placement: Place the submit button in a prominent and predictable location.
- Descriptive Text: Use clear and descriptive text for the submit button, such as “Sign Up” or “Place Order.”
13. Form Reset and Cancel Options
- Careful Use of Reset: Avoid using a reset button, as it can be accidentally clicked and frustrate users.
- Cancel Option: Provide a clear way for users to cancel the form if necessary.
14. Confirmation and Success Messages
- Feedback on Submission: Provide clear feedback when a form is successfully submitted.
- Next Steps: Inform users of the next steps after form submission, if applicable.
15. Security Considerations
- HTTPS: Always use HTTPS to protect data in transit.
- Input Sanitization: Sanitize user inputs to prevent security vulnerabilities like SQL injection and XSS attacks.
These practices help ensure forms are user-friendly, accessible, and secure, enhancing the overall user experience.
For more detailed information and examples on organizing form elements, you might find these resources useful: